一、插槽slot()
1.1简单插槽slot
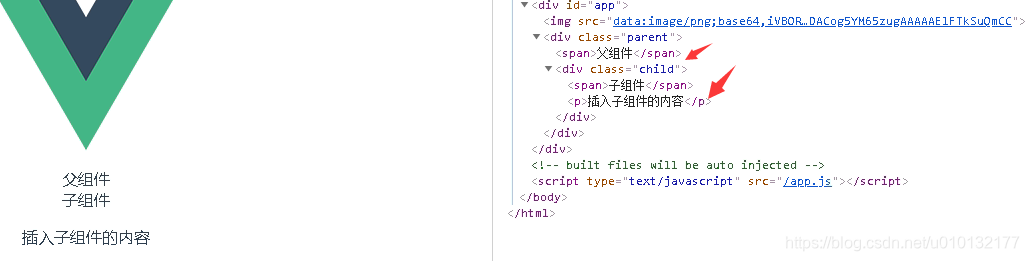
【功能】用于从父组件中,通过子组件写成双标签,向子组件中放入自定的内容
parent.vue
【1】首先把child写成双标签样式,把要插入的内容放双标签中间
【注】如果要控制样式在父组件中,在子组件中写样式都可以
<template><div class="parent"><span>父组件</span><Child><!--【1】首先把child写成双标签样式,把要插入的内容放双标签中间--><p>插入子组件的内容</p></Child></div>
</template><script>import Child from './child';export default{name:'parent',components:{Child,},data(){return{}},}
</script><style>
</style>
child.vue
【2】在子组件放个slot双标签接收父组件在双标签中插入的内容
<template><div class="child"><span>子组件</span><slot>如果没有传递内容则显示默认信息</slot> <!--【2】在子组件放个slot双标签接收父组件在双标签中插入的内容;如果没有传递,则显示默认的内容,如果传递了,则不显示默认内容--></div>
</template><script>export default{name:'child',data(){return{}},}
</script><style>
</style>
App.vue
不重要
<template><div id="app"><img src="./assets/logo.png"><Parent /> <!-- 【2】第2步,调用子组件 --></div>
</template><script>
import Parent from './components/parent' //【1】第1步,引入子组件export default {name: 'App',components: {Parent //【3】第3步,把组件写到此处,目的是把它暴露出去},data () {//data必须是一个函数,此为标准es6写法,也可写成data:function()return {msg: 'hello',}},
}
</script><style>
#app {font-family: 'Avenir', Helvetica, Arial, sans-serif;-webkit-font-smoothing: antialiased;-moz-osx-font-smoothing: grayscale;text-align: center;color: #2c3e50;margin-top: 60px;
}
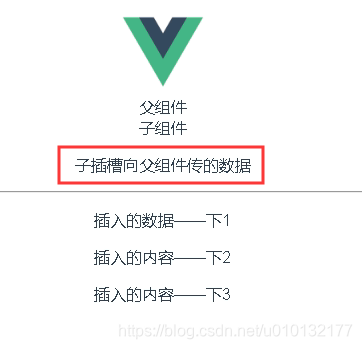
</style>效果:如下图,原写在父组件的内容,已经插入到子组件中了
1.2具名插槽(多个插槽-控制输入到子组件的不同位置)
parent.vue
【1】在child双标签下写入对应的内容,在标签上加个属性(<p slot=xxx,>)(xxx为子组件中的 name值<slot name=xxx>)在标签中加上想插入的内容
<template><div class="parent"><span>父组件</span><Child><p slot='top'>插入子组件的内容——上</p><p slot='bottom'>插入的内容——下</p></Child></div>
</template><script>import Child from './child';export default{name:'parent',components:{Child,},data(){return{}},}
</script><style>
</style>
child.vue
【1】对slot加个属性name=xxx,
<template><div class="child"><span>子组件</span><slot name="top">后备内容</slot><hr /><slot name="bottom">后备内容2</slot></div>
</template><script>export default{name:'child',data(){return{}},}
</script><style>
</style>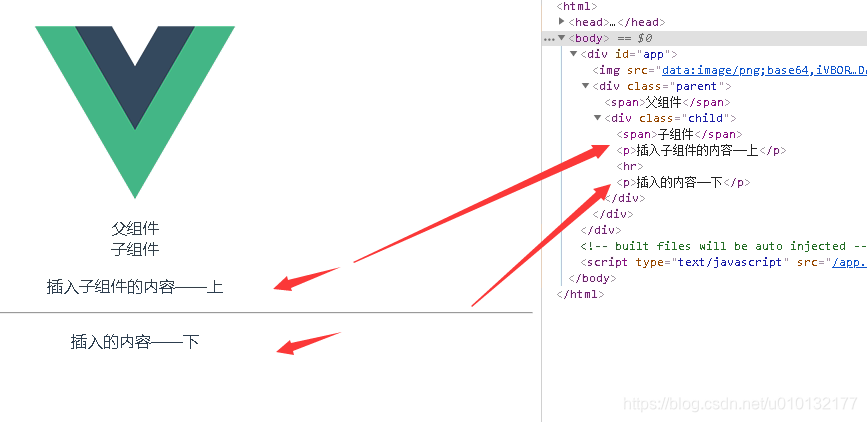
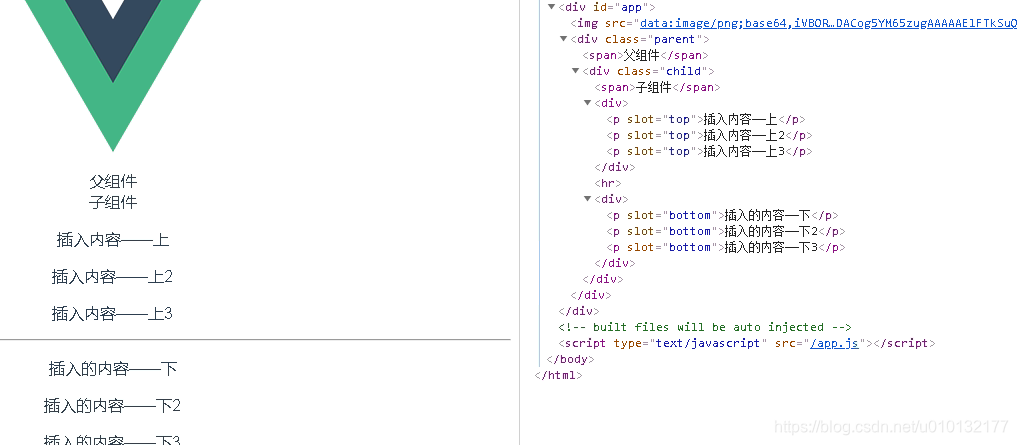
1.2.2插入一堆东西到子组件的插槽写法
只要把所子标签外面包一个父标签,把slot='name-value’放在父标签上即可
parent.vue
其它部分不变;
child.vue不变;
<Child><div slot='top'><p>插入内容——上</p><p>插入内容——上2</p><p>插入内容——上3</p></div><div slot='bottom'><p>插入的内容——下</p><p>插入的内容——下2</p><p>插入的内容——下3</p></div></Child>
效果:
1.3作用域插槽
用于子组件中的插槽向父组件对应插头传递数据;
官方文档:https://cn.vuejs.org/v2/guide/components-slots.html#作用域插槽
parent.vue
【1】首先必须要在对应插槽名字的位置加个属性slot-scope=‘props’;props可随意写,【2】处对应即可
【2】用{{props.text}}显示子组件插槽 传过来的数据
<template><div class="parent"><span>父组件</span><Child><div slot='top' slot-scope='props'> <!-- 【1】首先必须要在对应插槽名字的位置加个属性slot-scope='props'; props可随意写 --><p>{{props.text}}</p> <!-- 【2】用{{props.text}}显示子组件插槽 传过来的数据 --></div><div slot='bottom' ><p>插入的数据——下1</p><p>插入的内容——下2</p><p>插入的内容——下3</p></div></Child></div>
</template><script>import Child from './child';export default{name:'parent',components:{Child,},data(){return{}},}
</script><style>
</style>
child.vue
【1】通过在插槽里放一个自定义属性text='待传递的数据’向父组件传数据
<template><div class="child"><span>子组件</span><slot name="top" text='子插槽向父组件传的数据'>后备内容</slot><!-- 【1】通过在插槽里放一个自定义属性text='待传递的数据'向父组件传数据 --><hr/><slot name="bottom">后备内容2</slot></div>
</template><script>export default{name:'child',data(){return{}},}
</script><style>
</style>
效果:此即子组件的插槽向,父组件的对应插头传递的数据;
二、动态组件
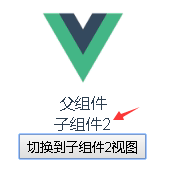
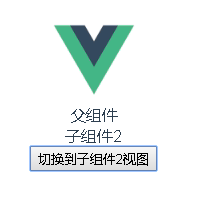
2.1简单的动态组件切换写法
parent.vue
【0】写1个数据用来指向随便一个子组件名
【1】动态组件写法,在内部加上属性用来绑定数据部分
【2】切换子组件,利用在methods里的changeView函数实现
【3】改变数据里的指向为另一个子组件2,即可在component里实现组件视图的切换
<template><div class="parent"><span>父组件</span>
<!-- 【1】动态组件写法,在内部加上属性用来绑定数据部分 --><component v-bind:is="currentView"></component><!-- 【2】切换子组件,利用在methods里的changeView函数实现 --><button v-on:click='changeView'>切换到子组件2视图</button></div>
</template><script>import Child from './child';import Child2 from './child2';export default{name:'parent',components:{Child,Child2,},data(){return{currentView:"Child" //【0】写1个数据用来指向随便一个子组件名}},methods:{changeView(){return this.currentView='Child2'//【3】改变数据里的指向为另一个子组件2,即可在component里实现组件视图的切换}}}
</script><style>
</style>
child.vue
<template><div class="child"><span>子组件1</span></div>
</template><script>export default{name:'child',data(){return{}},}
</script><style>
</style>
child2.vue
<template><div class="child2"><span>子组件2</span></div>
</template><script>export default{name:'child2',data(){return{}},}
</script><style>
</style>
结果:由子组件1切换到 子组件2.
2.2keep-alive标签把要来回切换的组件放到缓存中提高性能
keep-alive标签把要来回切换的组件放到缓存中提高性能,同时保持状态;
parent.vue
<template><div class="parent"><span>父组件</span><keep-alive><!-- 【2.1】把要切换的组件放在此标签内,可保持它一直被缓存在内存;切换回来时不会新建立一个组件实例;还有一个好处可以保持之前那个组件状态,选中哪个不会被清除; --><component v-bind:is="currentView"></component><!-- 【1】动态组件写法,在内部加上属性用来绑定数据部分 --></keep-alive><button v-on:click='changeView'>切换到子组件2视图</button><!-- 【2】切换子组件,利用在methods里的changeView函数实现 【2.2】切换也是这里--></div>
</template><script>import Child from './child';import Child2 from './child2';export default{name:'parent',components:{Child,Child2,},data(){return{currentView:"Child",//【0】写1个数据用来指向随便一个子组件名flag:true,//【2.0】设置一个标志}},methods:{changeView(){if(this.flag){//【2.3】也是调用这个函数this.currentView='Child';//【3】改变数据里的指向为另一个子组件2,即可在component里实现组件视图的切换this.flag=false;}else{this.currentView='Child2';this.flag=true;}}}}
</script><style>
</style>
child.vue
<template><div class="child"><span>子组件1</span></div>
</template><script>export default{name:'child',data(){return{}},}
</script><style>
</style>
child2.vue
<template><div class="child2"><span>子组件2</span></div>
</template><script>export default{name:'child2',data(){return{}},}
</script><style>
</style>
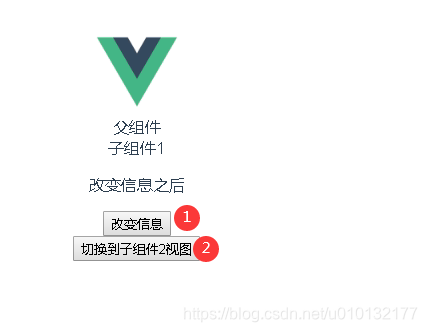
2.2.1keep-alive保持状态效果
其它代码同上例,只有child.vue改变
child.vue
1、在数据里定义一个msg
2、用按钮改变它,因为parent.vue里用了keep-alive标签,所以改变后的msg信息不会变回之前
<template><div class="child"><span>子组件1</span><p>{{msg}}</p><button @click="chMsg">改变信息</button></div>
</template><script>export default{name:'child',data(){return{msg:'信息变之前',}},methods:{chMsg(){this.msg='改变信息之后'}}}
</script><style>
</style>
结果:
1、先点1号按钮改变子组件里的msg信息
2、再点2号按钮切换视图,再点回来,Msg改变后的信息没变(还是“改变信息之后”)