Flume日志采集框架
目标
- 掌握flume的应用场景
- 掌握flume中常用的source、channel、sink使用
- 掌握flume的企业案例
1. Flume是什么

在一个完整的离线大数据处理系统中,除了hdfs+mapreduce+hive组成分析系统的核心之外,还需要数据采集、结果数据导出、任务调度等不可或缺的辅助系统,而这些辅助工具在hadoop生态体系中都有便捷的开源框架。
- Flume是Cloudera提供的一个高可用的,高可靠的,分布式的海量日志采集、聚合和传输的系统
- Flume支持在日志系统中定制各类数据发送方,用于收集数据;
- Flume提供对数据进行简单处理,并写到各种数据接受方(可定制)的能力。
2. Flume的架构
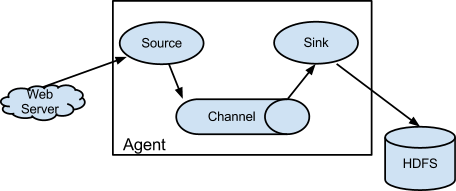
- Flume 的核心,是把数据从数据源收集过来,再送到目的地。
- 为了保证输送一定成功,在送到目的地之前,会先缓存数据,待数据真正到达目的地后,删除自己缓存的数据。
- Flume分布式系统中最核心的角色是agent,flume采集系统就是由一个个agent所连接起来形成。
- 每一个agent相当于一个数据传递员,内部有三个组件
- source
- 采集组件,用于跟数据源对接,以获取数据
- channel
- 传输通道组件,缓存数据,用于从source将数据传递到sink
- sink
- 下沉组件,数据发送给最终存储系统或者下一级agent中
- source
3. Flume采集系统结构图
3.1 简单结构
- 单个agent采集数据

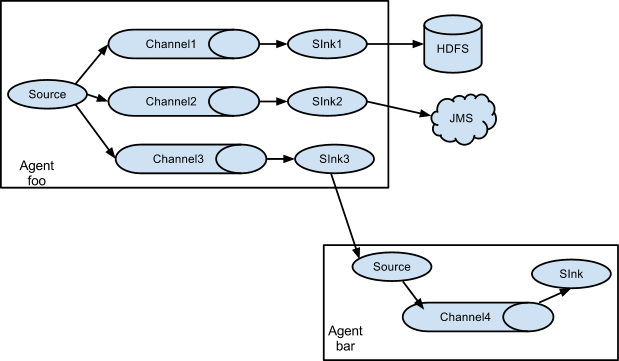
3.2 复杂结构
-
2个agent串联

-
多个agent串联
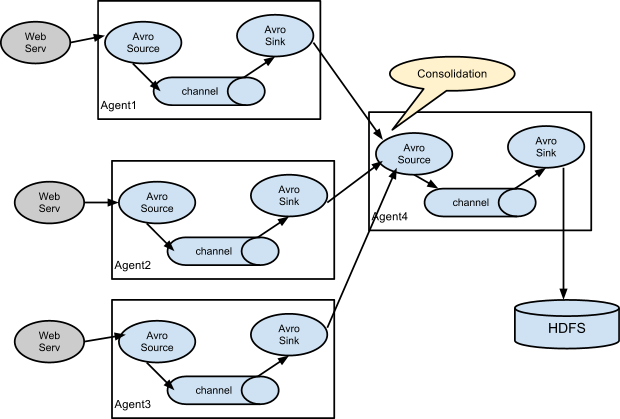
- 多个channel
4. Flume安装部署(5分钟)
Flume安装很简单,解压好基本上就可以使用
-
1、下载安装包
- http://archive.cloudera.com/cdh5/cdh/5/flume-ng-1.6.0-cdh5.14.2.tar.gz
- flume-ng-1.6.0-cdh5.14.2.tar.gz
-
2、规划安装目录
- /kkb/install
-
3、上传安装包到服务器
-
4、解压安装包到指定的规划目录
- tar -zxvf flume-ng-1.6.0-cdh5.14.2.tar.gz -C /kkb/install
-
5、重命名解压目录
- mv apache-flume-1.6.0-cdh5.14.2-bin flume-1.6.0-cdh5.14.2
-
6、修改配置
-
进入到flume安装目录下的conf文件夹中
-
先重命名文件
- mv flume-env.sh.template flume-env.sh
-
修改文件,添加java环境变量
- vim flume-env.sh
export JAVA_HOME=/kkb/install/jdk1.8.0_141
-
-
5. Flume实战
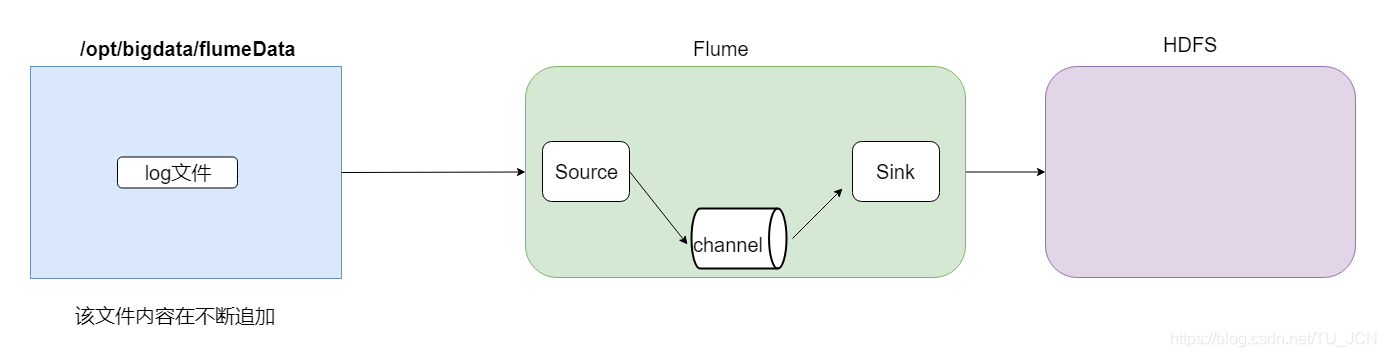
5.1 采集文件到控制台
-
1、需求描述
监控一个文件,如果有新增的内容,就把数据采集之后打印控制台,通常用于测试/调试目的
-
2、flume配置文件开发
- 在flume的安装目录下创建一个文件夹myconf, 后期存放flume开发的配置文件
- mkdir /kkb/install/flume-1.6.0-cdh5.14.2/myconf
- vim tail-memory-logger.conf
# Name the components on this agent #定义一个agent,分别指定source、channel、sink别名 a1.sources = r1 a1.sinks = k1 a1.channels = c1#配置source #指定source的类型为exec,通过Unix命令来传输结果数据 a1.sources.r1.type = exec #监控一个文件,有新的数据产生就不断采集走 a1.sources.r1.command = tail -F /kkb/install/flumeData/tail.log #指定source的数据流入的channel中 a1.sources.r1.channels = c1#配置channel #指定channel的类型为memory a1.channels.c1.type = memory #指定channel的最多可以存放数据的容量 a1.channels.c1.capacity = 1000 #指定在一个事务中source写数据到channel或者sink从channel取数据最大条数 a1.channels.c1.transactionCapacity = 100#配置sink a1.sinks.k1.channel = c1 #类型是日志格式,结果会打印在控制台 a1.sinks.k1.type = logger - 在flume的安装目录下创建一个文件夹myconf, 后期存放flume开发的配置文件
-
3、启动agent
-
进入到node01上的/kkb/install/flume-1.6.0-cdh5.14.2目录下执行
bin/flume-ng agent -n a1 -c myconf -f myconf/tail-memory-logger.conf -D flume.root.logger=info,console
其中: -n:表示指定该agent名称 -c:表示配置文件所在的目录 -f:表示配置文件的路径名称 -D:表示指定key=value键值对---这里指定的是启动的日志输出级别 -
5.2 采集文件到HDFS
-
1、需求描述
- 监控一个文件,如果有新增的内容,就把数据采集到HDFS上
-
2、结构示意图
-
3、flume配置文件开发
- vim file2Hdfs.conf
# Name the components on this agent a1.sources = r1 a1.sinks = k1 a1.channels = c1#配置source a1.sources.r1.type = exec a1.sources.r1.command = tail -F /kkb/install/flumeData/tail.log a1.sources.r1.channels = c1#配置channel a1.channels.c1.type = file #设置检查点目录--该目录是记录下event在数据目录下的位置 a1.channels.c1.checkpointDir=/kkb/data/flume_checkpoint #数据存储所在的目录 a1.channels.c1.dataDirs=/kkb/data/flume_data#配置sink a1.sinks.k1.channel = c1 #指定sink类型为hdfs a1.sinks.k1.type = hdfs #指定数据收集到hdfs目录 a1.sinks.k1.hdfs.path = hdfs://node01:9000/tailFile/%Y-%m-%d/%H%M #指定生成文件名的前缀 a1.sinks.k1.hdfs.filePrefix = events-#是否启用时间上的”舍弃” -->控制目录 a1.sinks.k1.hdfs.round = true #时间上进行“舍弃”的值 # 如 12:10 -- 12:19 => 12:10 # 如 12:20 -- 12:29 => 12:20 a1.sinks.k1.hdfs.roundValue = 10 #时间上进行“舍弃”的单位 a1.sinks.k1.hdfs.roundUnit = minute# 控制文件个数 #60s或者50字节或者10条数据,谁先满足,就开始滚动生成新文件 a1.sinks.k1.hdfs.rollInterval = 60 a1.sinks.k1.hdfs.rollSize = 50 a1.sinks.k1.hdfs.rollCount = 10#每个批次写入的数据量 a1.sinks.k1.hdfs.batchSize = 100#开始本地时间戳--开启后就可以使用%Y-%m-%d去解析时间 a1.sinks.k1.hdfs.useLocalTimeStamp = true#生成的文件类型,默认是Sequencefile,可用DataStream,则为普通文本 a1.sinks.k1.hdfs.fileType = DataStream -
4、启动agent
- 进入到node01上的/kkb/install/flume-1.6.0-cdh5.14.2目录下执行
bin/flume-ng agent -n a1 -c myconf -f myconf/file2Hdfs.conf -Dflume.root.logger=info,console
5.3 采集目录到HDFS
-
1、需求描述
- 一个目录中,不断有新的文件产生,需要把目录中的文件,不断地进行数据收集保存到HDFS上
-
2、结构示意图

-
3、flume配置文件开发
- 在myconf目录中创建配置文件添加内容
- vim dir2Hdfs.conf
# Name the components on this agent a1.sources = r1 a1.sinks = k1 a1.channels = c1# 配置source ##注意:不能往监控目中重复丢同名文件 a1.sources.r1.type = spooldir a1.sources.r1.spoolDir = /kkb/install/flumeData/files # 是否将文件的绝对路径添加到header a1.sources.r1.fileHeader = true a1.sources.r1.channels = c1#配置channel a1.channels.c1.type = memory a1.channels.c1.capacity = 1000 a1.channels.c1.transactionCapacity = 100#配置sink a1.sinks.k1.type = hdfs a1.sinks.k1.channel = c1 a1.sinks.k1.hdfs.path = hdfs://node01:9000/spooldir/%Y-%m-%d/%H%M a1.sinks.k1.hdfs.filePrefix = events- a1.sinks.k1.hdfs.round = true a1.sinks.k1.hdfs.roundValue = 10 a1.sinks.k1.hdfs.roundUnit = minute a1.sinks.k1.hdfs.rollInterval = 60 a1.sinks.k1.hdfs.rollSize = 50 a1.sinks.k1.hdfs.rollCount = 10 a1.sinks.k1.hdfs.batchSize = 100 a1.sinks.k1.hdfs.useLocalTimeStamp = true #生成的文件类型,默认是Sequencefile,可用DataStream,则为普通文本 a1.sinks.k1.hdfs.fileType = DataStream - 在myconf目录中创建配置文件添加内容
-
4、启动agent
- 进入到node01上的/kkb/install/flume-1.6.0-cdh5.14.2目录下执行
bin/flume-ng agent -n a1 -c myconf -f myconf/dir2Hdfs.conf -Dflume.root.logger=info,console
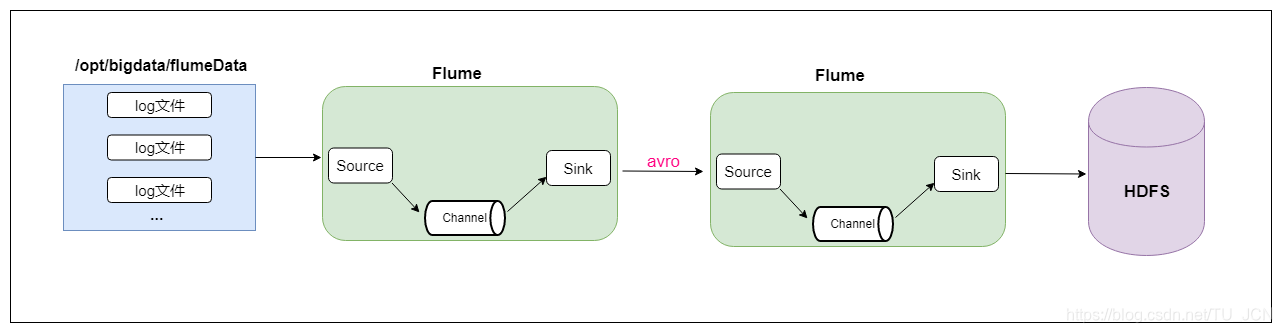
5.4 两个agent串联,一个监控,一个传输
-
1、需求描述
- 第一个agent,负责监控某个目录中新增的文件进行数据收集,通过网络发送到第二个agent当中去,
- 第二个agent,负责接收第一个agent发送的数据,并将数据保存到hdfs上面去。
-
2、结构示意图
-
3、在node01和node02上分别都安装flume
-
4、创建node01上的flume配置文件
- vim dir2avro.conf
# Name the components on this agent a1.sources = r1 a1.sinks = k1 a1.channels = c1# 配置source ##注意:不能往监控目中重复丢同名文件 a1.sources.r1.type = spooldir a1.sources.r1.spoolDir = /kkb/install/flumeData/files a1.sources.r1.fileHeader = true a1.sources.r1.channels = c1#配置channel a1.channels.c1.type = memory a1.channels.c1.capacity = 1000 a1.channels.c1.transactionCapacity = 100#配置sink a1.sinks.k1.channel = c1 #AvroSink是用来通过网络来传输数据的,可以将event发送到RPC服务器(比如AvroSource) a1.sinks.k1.type = avro#node02 注意修改为自己的hostname a1.sinks.k1.hostname = node02 a1.sinks.k1.port = 4141 -
5、创建node02上的flume配置文件
- vim avro2Hdfs.conf
# Name the components on this agent a1.sources = r1 a1.sinks = k1 a1.channels = c1#配置source #通过AvroSource接受AvroSink的网络数据 a1.sources.r1.type = avro a1.sources.r1.channels = c1 #AvroSource服务的ip地址 a1.sources.r1.bind = node02 #AvroSource服务的端口 a1.sources.r1.port = 4141#配置channel a1.channels.c1.type = memory a1.channels.c1.capacity = 1000 a1.channels.c1.transactionCapacity = 100#配置sink a1.sinks.k1.channel = c1 a1.sinks.k1.type = hdfs a1.sinks.k1.hdfs.path = hdfs://node01:9000/avro-hdfs/%Y-%m-%d/%H-%M a1.sinks.k1.hdfs.filePrefix = events- a1.sinks.k1.hdfs.round = true a1.sinks.k1.hdfs.roundValue = 10 a1.sinks.k1.hdfs.roundUnit = minute a1.sinks.k1.hdfs.rollInterval = 60 a1.sinks.k1.hdfs.rollSize = 50 a1.sinks.k1.hdfs.rollCount = 10 a1.sinks.k1.hdfs.batchSize = 100 a1.sinks.k1.hdfs.useLocalTimeStamp = true #生成的文件类型,默认是Sequencefile,可用DataStream,则为普通文本 a1.sinks.k1.hdfs.fileType = DataStream -
6、启动agent
-
先启动node02上的flume。然后在启动node01上的flume
-
在node02上的flume安装目录下执行
- bin/flume-ng agent -n a1 -c myconf -f myconf/avro2Hdfs.conf -Dflume.root.logger=info,console
-
在node01上的flume安装目录下执行
- bin/flume-ng agent -n a1 -c myconf -f myconf/dir2avro.conf -Dflume.root.logger=info,console
-
最后在node01上的/kkb/install/flumeData/files目录下创建一些数据文件,最后去HDFS上查看数据。
-
-
6. 高可用配置案例(故障转移、负载均衡)
6.1 failover故障转移

- 1、节点分配
| 名称 | 服务器主机名 | ip地址 | 角色 |
|---|---|---|---|
| Agent1 | node01 | 192.168.200.200 | WebServer |
| Collector1 | node02 | 192.168.200.210 | AgentMstr1 |
| Collector2 | node03 | 192.168.200.220 | AgentMstr2 |
Agent1数据分别流入到Collector1和Collector2,Flume NG本身提供了Failover机制,可以自动切换和恢复。
-
2、开发配置文件
-
node01、node02、node03分别都要安装flume
-
创建node01上的flume配置文件
- vim flume-client-failover.conf
#agent name
a1.channels = c1
a1.sources = r1
#定义了2个sink
a1.sinks = k1 k2#set gruop
#设置一个sink组,一个sink组下可以包含很多个sink
a1.sinkgroups = g1#set sink group
#指定g1这个sink组下有k1  k2 这2个sink
a1.sinkgroups.g1.sinks = k1 k2#set source
a1.sources.r1.channels = c1
a1.sources.r1.type = exec
a1.sources.r1.command = tail -F /kkb/install/flumeData/tail.log#set channel
a1.channels.c1.type = memory
a1.channels.c1.capacity = 1000
a1.channels.c1.transactionCapacity = 100# set sink1    指定sink1的数据会传输给node02
a1.sinks.k1.channel = c1
a1.sinks.k1.type = avro
a1.sinks.k1.hostname = node02
a1.sinks.k1.port = 52020# set sink2    指定sink2的数据会传输给node03
a1.sinks.k2.channel = c1
a1.sinks.k2.type = avro
a1.sinks.k2.hostname = node03
a1.sinks.k2.port = 52020#set failover
#指定sink组高可用的策略---failover故障转移
a1.sinkgroups.g1.processor.type = failover
#指定k1这个sink的优先级
a1.sinkgroups.g1.processor.priority.k1 = 10
#指定k2这个sink的优先级
a1.sinkgroups.g1.processor.priority.k2 = 5
#指定故障转移的最大时间,如果超时会出现异常
a1.sinkgroups.g1.processor.maxpenalty = 10000
说明: #这里首先要申明一个sinkgroups, 然后再设置2个sink ,k1与k2,其中2个优先级是10和5。 #而processor的maxpenalty被设置为10秒,默认是30秒.表示故障转移的最大时间 -
创建node02和node03上的flume配置文件
- node02和node03上配置信息相同
- vim flume-server-failover.conf
#set Agent name
a1.sources = r1
a1.channels = c1
a1.sinks = k1#set channel
a1.channels.c1.type = memory
a1.channels.c1.capacity = 1000
a1.channels.c1.transactionCapacity = 100# set source
a1.sources.r1.type = avro
a1.sources.r1.bind = 0.0.0.0
a1.sources.r1.port = 52020
a1.sources.r1.channels = c1#配置拦截器
#指定2个拦截器  i1  i2
a1.sources.r1.interceptors = i1 i2
#i1的类型为时间戳拦截器  可以解析%Y-%m-%d 时间
a1.sources.r1.interceptors.i1.type = timestamp
#i2的类型为主机拦截器,可以获取当前event中携带的主机名
a1.sources.r1.interceptors.i2.type = host
#指定主机名变量
a1.sources.r1.interceptors.i2.hostHeader=hostname#set sink to hdfs
a1.sinks.k1.channel = c1
a1.sinks.k1.type=hdfs
a1.sinks.k1.hdfs.path=hdfs://node01:8020/failover/logs/%{hostname}
a1.sinks.k1.hdfs.filePrefix=%Y-%m-%d
a1.sinks.k1.hdfs.round = true
a1.sinks.k1.hdfs.roundValue = 10
a1.sinks.k1.hdfs.roundUnit = minute
a1.sinks.k1.hdfs.rollInterval = 60
a1.sinks.k1.hdfs.rollSize = 50
a1.sinks.k1.hdfs.rollCount = 10
a1.sinks.k1.hdfs.batchSize = 100
a1.sinks.k1.hdfs.fileType = DataStream
-
-
3、启动flume配置
-
(1) 先分别在node02和node03上启动flume
- 分别进入到flume的安装目录下执行命令
- bin/flume-ng agent -n a1 -c myconf -f myconf/flume-server-failover.conf -Dflume.root.logger=info,console
- 分别进入到flume的安装目录下执行命令
-
(2) 然后在node01上启动flume
- 进入到flume的安装目录下执行命令
- bin/flume-ng agent -n a1 -c myconf -f myconf/flume-client-failover.conf -Dflume.root.logger=info,console
- 进入到flume的安装目录下执行命令
-
(3) 最后在hdfs目录上观察数据
- hdfs://node01:8020/failover/logs
-
6.2 load balance负载均衡
-
实现多个flume采集数据的时候避免单个flume的负载比较高,实现多个flume采集器负载均衡。
-
1、节点分配
- 与failover故障转移的节点分配
-
2、开发配置文件
-
创建node01上的flume配置文件
- vim flume-client-loadbalance.conf
#agent name a1.channels = c1 a1.sources = r1 a1.sinks = k1 k2#set gruop a1.sinkgroups = g1#set sink group a1.sinkgroups.g1.sinks = k1 k2#set source a1.sources.r1.channels = c1 a1.sources.r1.type = exec a1.sources.r1.command = tail -F /kkb/install/flumeData/tail.log#set channel a1.channels.c1.type = memory a1.channels.c1.capacity = 1000 a1.channels.c1.transactionCapacity = 100# set sink1 a1.sinks.k1.channel = c1 a1.sinks.k1.type = avro a1.sinks.k1.hostname = node02 a1.sinks.k1.port = 52020# set sink2 a1.sinks.k2.channel = c1 a1.sinks.k2.type = avro a1.sinks.k2.hostname = node03 a1.sinks.k2.port = 52020#set load-balance #指定sink组高可用的策略---load_balance负载均衡 a1.sinkgroups.g1.processor.type =load_balance # 默认是round_robin,还可以选择random a1.sinkgroups.g1.processor.selector = round_robin #如果backoff被开启,则sink processor会屏蔽故障的sink a1.sinkgroups.g1.processor.backoff = true -
创建node02和node03上的flume配置文件
- vim flume-server-loadbalance.conf
#set Agent name a1.sources = r1 a1.channels = c1 a1.sinks = k1#set channel a1.channels.c1.type = memory a1.channels.c1.capacity = 1000 a1.channels.c1.transactionCapacity = 100# set source a1.sources.r1.type = avro a1.sources.r1.bind = 0.0.0.0 a1.sources.r1.port = 52020 a1.sources.r1.channels = c1#配置拦截器 a1.sources.r1.interceptors = i1 i2 a1.sources.r1.interceptors.i1.type = timestamp a1.sources.r1.interceptors.i2.type = host a1.sources.r1.interceptors.i2.hostHeader=hostname #hostname不使用ip显示,直接就是该服务器对应的主机名 a1.sources.r1.interceptors.i2.useIP=false#set sink to hdfs a1.sinks.k1.channel = c1 a1.sinks.k1.type=hdfs a1.sinks.k1.hdfs.path=hdfs://node01:8020/loadbalance/logs/%{hostname} a1.sinks.k1.hdfs.filePrefix=%Y-%m-%d a1.sinks.k1.hdfs.round = true a1.sinks.k1.hdfs.roundValue = 10 a1.sinks.k1.hdfs.roundUnit = minute a1.sinks.k1.hdfs.rollInterval = 60 a1.sinks.k1.hdfs.rollSize = 50 a1.sinks.k1.hdfs.rollCount = 10 a1.sinks.k1.hdfs.batchSize = 100 a1.sinks.k1.hdfs.fileType = DataStream -
-
3、启动flume配置
- 先分别在node02和node03上启动flume
-
分别进入到flume的安装目录下执行命令
- bin/flume-ng agent -n a1 -c myconf -f myconf/flume-server-loadbalance.conf -Dflume.root.logger=info,console
-
-
然后在node01上启动flume
-
分别进入到flume的安装目录下执行命令
- bin/flume-ng agent -n a1 -c myconf -f myconf/flume-client-loadbalance.conf -Dflume.root.logger=info,console
-
-
最后在hdfs上目录观察数据
hdfs://node01:8020/loadbalance/logs
- 先分别在node02和node03上启动flume
7. flume企业案例
7.1 flume案例—静态拦截器使用
- 1、案例场景
A、B两台日志服务机器实时生产日志主要类型为access.log、nginx.log、web.log 。
现在需要把A、B 机器中的access.log、nginx.log、web.log 采集汇总到C机器上然后统一收集到hdfs中。
但是在hdfs中要求的目录为:
/source/logs/access/20180101/**
/source/logs/nginx/20180101/**
/source/logs/web/20180101/**
-
2、场景分析

-
3、数据流程处理分析

-
4、开发配置文件
-
在node01与node02服务器开发flume的配置文件
- vim exec_source_avro_sink.conf
# Name the components on this agent #定义三个source a1.sources = r1 r2 r3 a1.sinks = k1 a1.channels = c1# Describe/configure the source a1.sources.r1.type = exec a1.sources.r1.command = tail -F /home/hadoop/taillogs/access.log #指定source r1 使用拦截器i1 a1.sources.r1.interceptors = i1 #拦截器类型static静态 a1.sources.r1.interceptors.i1.type = static ## static拦截器的功能就是往采集到的数据的header中插入自己定义的key-value对 # 自己进行设置,我们这里的key和value相当于键值对,k=type v=access a1.sources.r1.interceptors.i1.key = type a1.sources.r1.interceptors.i1.value = accessa1.sources.r2.type = exec a1.sources.r2.command = tail -F /home/hadoop/taillogs/nginx.log #指定source r2 使用拦截器i2 a1.sources.r2.interceptors = i2 #拦截器类型static静态 a1.sources.r2.interceptors.i2.type = static # 自己进行设置 a1.sources.r2.interceptors.i2.key = type a1.sources.r2.interceptors.i2.value = nginxa1.sources.r3.type = exec a1.sources.r3.command = tail -F /home/hadoop/taillogs/web.log #指定source r3 使用拦截器i3 a1.sources.r3.interceptors = i3 #拦截器类型static静态 a1.sources.r3.interceptors.i3.type = static # 自己进行设置 a1.sources.r3.interceptors.i3.key = type a1.sources.r3.interceptors.i3.value = web# Use a channel which buffers events in memory a1.channels.c1.type = memory a1.channels.c1.capacity = 20000 a1.channels.c1.transactionCapacity = 10000# Describe the sink a1.sinks.k1.type = avro a1.sinks.k1.hostname = node03 a1.sinks.k1.port = 41414 a1.sinks.k1.channel = c1# Bind the source and sink to the channel a1.sources.r1.channels = c1 a1.sources.r2.channels = c1 a1.sources.r3.channels = c1 -
在node03服务器上开发flume配置文件
- vim avro_source_hdfs_sink.conf
a1.sources = r1
a1.sinks = k1
a1.channels = c1
#定义source
a1.sources.r1.type = avro
a1.sources.r1.bind = node03
a1.sources.r1.port =41414#定义channels
a1.channels.c1.type = memory
a1.channels.c1.capacity = 20000
a1.channels.c1.transactionCapacity = 1000#定义sink
a1.sinks.k1.type = hdfs
# 此处的%{type} 这里是取我们在node01和node02定义的type的值,也就是value
a1.sinks.k1.hdfs.path=hdfs://node01:9000/source/logs/%{type}/%Y%m%d
a1.sinks.k1.hdfs.filePrefix =events-
a1.sinks.k1.hdfs.fileType = DataStream
a1.sinks.k1.hdfs.writeFormat = Text
#时间类型
a1.sinks.k1.hdfs.useLocalTimeStamp = true
#生成的文件不按条数生成
a1.sinks.k1.hdfs.rollCount = 0
#生成的文件按时间生成
a1.sinks.k1.hdfs.rollInterval = 30
#生成的文件按大小生成
a1.sinks.k1.hdfs.rollSize  = 10485760
#批量写入hdfs的个数
a1.sinks.k1.hdfs.batchSize = 1000
#flume操作hdfs的线程数(包括新建,写入等)
a1.sinks.k1.hdfs.threadsPoolSize=10
#操作hdfs超时时间
a1.sinks.k1.hdfs.callTimeout=30000#组装source、channel、sink
a1.sources.r1.channels = c1
a1.sinks.k1.channel = c1
-
-
5、启动flume配置
-
先在node03上启动flume
- bin/flume-ng agent -n a1 -c myconf -f myconf/avro_source_hdfs_sink.conf -Dflume.root.logger=info,console
-
然后分别在node01和node02上启动flume
- bin/flume-ng agent -n a1 -c myconf -f myconf/exec_source_avro_sink.conf -Dflume.root.logger=info,console
-
在node01和node02上准备数据文件
/home/hadoop/taillogs/access.log /home/hadoop/taillogs/nginx.log /home/hadoop/taillogs/web.log创建以上文件,内容是什么不重要 -
最后在hdfs上对应的目录观察
hdfs://node01:8020/source/logs -
7.2 flume案例—自定义拦截器
- 1、案例场景
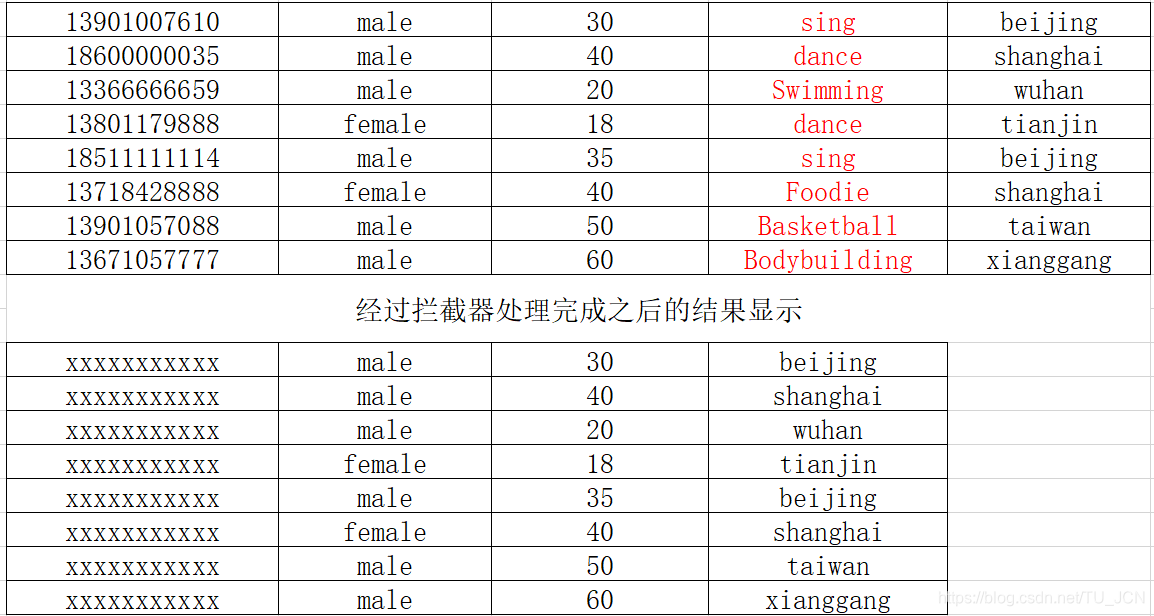
在数据采集之后,通过flume的拦截器,实现不需要的数据过滤掉,并将指定的第一个字段进行加密,加密之后再往hdfs上面保存
- 2、数据文件 user.txt
13901007610,male,30,sing,beijing
18600000035,male,40,dance,shanghai
13366666659,male,20,Swimming,wuhan
13801179888,female,18,dance,tianjin
18511111114,male,35,sing,beijing
13718428888,female,40,Foodie,shanghai
13901057088,male,50,Basketball,taiwan
13671057777,male,60,Bodybuilding,xianggang
- 3、创建maven工程添加依赖
 <repositories><repository><id>cloudera</id><url>https://repository.cloudera.com/artifactory/cloudera-repos/</url></repository></repositories><dependencies><dependency><groupId>org.apache.flume</groupId><artifactId>flume-ng-core</artifactId><version>1.6.0-cdh5.14.2</version></dependency>
</dependencies><build><plugins><plugin><groupId>org.apache.maven.plugins</groupId><artifactId>maven-compiler-plugin</artifactId><version>3.0</version><configuration><source>1.8</source><target>1.8</target><encoding>UTF-8</encoding><!--    <verbal>true</verbal>--></configuration></plugin><plugin><groupId>org.apache.maven.plugins</groupId><artifactId>maven-shade-plugin</artifactId><version>3.1.1</version><executions><execution><phase>package</phase><goals><goal>shade</goal></goals><configuration><filters><filter><artifact>*:*</artifact><excludes><exclude>META-INF/*.SF</exclude><exclude>META-INF/*.DSA</exclude><exclude>META-INF/*.RSA</exclude></excludes></filter></filters><transformers><transformer implementation="org.apache.maven.plugins.shade.resource.ManifestResourceTransformer"><mainClass></mainClass></transformer></transformers></configuration></execution></executions></plugin></plugins></build>
- 4、代码开发
import com.google.common.base.Charsets;
import org.apache.flume.Context;
import org.apache.flume.Event;
import org.apache.flume.interceptor.Interceptor;import java.math.BigInteger;
import java.security.MessageDigest;
import java.security.NoSuchAlgorithmException;
import java.util.ArrayList;
import java.util.List;public class MyInterceptor implements Interceptor {/** encrypted_field_index. 指定需要加密的字段下标 */private final String encrypted_field_index;/** The out_index. 指定不需要对应列的下标*/private final String out_index;/*** 提供构建方法,后期可以接受配置文件中的参数* @param encrypted_field_index* @param out_index*/public MyInterceptor( String encrypted_field_index, String out_index) {this.encrypted_field_index=encrypted_field_index.trim();this.out_index=out_index.trim();}/** 单个event拦截逻辑*/public Event intercept(Event event) {if (event == null) {return null;}try {String line = new String(event.getBody(), Charsets.UTF_8);String[] fields = line.split(",");String newLine = "";for (int i = 0; i < fields.length; i++) {//字符串数字转换成intint encryptedField = Integer.parseInt(encrypted_field_index);int outIndex = Integer.parseInt(out_index);if (i == encryptedField) {newLine+=md5(fields[i])+",";}else if(i !=outIndex) {newLine+=fields[i]+",";}}newLine=newLine.substring(0,newLine.length()-1);event.setBody(newLine.getBytes(Charsets.UTF_8));return event;} catch (Exception e) {return event;}}/*** 批量event拦截逻辑*/public List<Event> intercept(List<Event> events) {List<Event> out = new ArrayList<Event>();for (Event event : events) {Event outEvent = intercept(event);if (outEvent != null) {out.add(outEvent);}}return out;}public void close() {}public void initialize() {}//写一个md5加密的方法public static String md5(String plainText) {//定义一个字节数组byte[] secretBytes = null;try {// 生成一个MD5加密计算摘要MessageDigest md = MessageDigest.getInstance("MD5");//对字符串进行加密md.update(plainText.getBytes());//获得加密后的数据secretBytes = md.digest();} catch (NoSuchAlgorithmException e) {throw new RuntimeException("没有md5这个算法!");}//将加密后的数据转换为16进制数字String md5code = new BigInteger(1, secretBytes).toString(16);// 16进制数字// 如果生成数字未满32位,需要前面补0for (int i = 0; i < 32 - md5code.length(); i++) {md5code = "0" + md5code;}return md5code;}/*** 相当于自定义Interceptor的工厂类* 在flume采集配置文件中通过制定该Builder来创建Interceptor对象* 可以在Builder中获取、解析flume采集配置文件中的拦截器Interceptor的自定义参数:* 指定需要加密的字段下标 指定不需要对应列的下标等* @author**/public static class MyBuilder implements Interceptor.Builder {/*** encrypted_field_index. 指定需要加密的字段下标*/private  String encrypted_field_index;/*** The out_index. 指定不需要对应列的下标*/private  String out_index;public void configure(Context context) {this.encrypted_field_index = context.getString("encrypted_field_index", "");this.out_index = context.getString("out_index", "");}/** @see org.apache.flume.interceptor.Interceptor.Builder#build()*/public MyInterceptor build() {return new MyInterceptor(encrypted_field_index, out_index);}}}
-
5、打成jar包后放到flume安装目录下的lib中
-
6、创建配置文件 flume-interceptor-hdfs.conf
# Name the components on this agent
a1.sources = r1
a1.sinks = k1
a1.channels = c1#配置source
a1.sources.r1.type = exec
a1.sources.r1.command = tail -F /kkb/install/flumeData/user.txt
a1.sources.r1.channels = c1
a1.sources.r1.interceptors =i1
a1.sources.r1.interceptors.i1.type =com.kaikeba.interceptor.MyInterceptor$MyBuilder
a1.sources.r1.interceptors.i1.encrypted_field_index=0
a1.sources.r1.interceptors.i1.out_index=3#配置channel
a1.channels.c1.type = memory
a1.channels.c1.capacity = 1000
a1.channels.c1.transactionCapacity = 100#配置sink
a1.sinks.k1.type = hdfs
a1.sinks.k1.channel = c1
a1.sinks.k1.hdfs.path = hdfs://node01:8020/interceptor/files/%Y-%m-%d/%H%M
a1.sinks.k1.hdfs.filePrefix = events-
a1.sinks.k1.hdfs.round = true
a1.sinks.k1.hdfs.roundValue = 10
a1.sinks.k1.hdfs.roundUnit = minute
a1.sinks.k1.hdfs.rollInterval = 5
a1.sinks.k1.hdfs.rollSize = 50
a1.sinks.k1.hdfs.rollCount = 10
a1.sinks.k1.hdfs.batchSize = 100
a1.sinks.k1.hdfs.useLocalTimeStamp = true
#生成的文件类型,默认是Sequencefile,可用DataStream,则为普通文本
a1.sinks.k1.hdfs.fileType = DataStream
- 7、进入到flume安装目录下启动flume
- bin/flume-ng agent -n a1 -c myconf -f myconf/flume-interceptor-hdfs.conf -Dflume.root.logger=info,console
8. flume—自定义Source
8.1 场景描述
官方提供的source类型已经很多,官方说明:http://flume.apache.org/FlumeUserGuide.html#flume-sources
但是有时候并不能满足实际开发当中的需求,此时我们就需要根据实际需求自定义某些source。如:实时监控MySQL,从MySQL中获取数据传输到HDFS或者其他存储框架,所以此时需要我们自己实现MySQLSource。
官方也提供了自定义source的接口:
官网说明:https://flume.apache.org/FlumeDeveloperGuide.html#source
8.2 自定义MysqlSource步骤
-
1、根据官方说明自定义mysqlsource需要继承AbstractSource类并实现Configurable和PollableSource接口。
-
2、实现对应的方法
- configure(Context context)
- 初始化context
- process()
- 从mysql表中获取数据,然后把数据封装成event对象写入到channel,该方法被一直调用
- stop()
- 关闭相关资源
- configure(Context context)
-
3、开发流程
- 3.1 创建mysql数据库以及mysql数据库表
--创建一个数据库 CREATE DATABASE IF NOT EXISTS mysqlsource DEFAULT CHARACTER SET utf8 ;--创建一个表,用户保存拉取目标表位置的信息 CREATE TABLE mysqlsource.flume_meta (source_tab varchar(255) NOT NULL,currentIndex varchar(255) NOT NULL,PRIMARY KEY (source_tab) ) ENGINE=InnoDB DEFAULT CHARSET=utf8;--插入数据 insert into mysqlsource.flume_meta(source_tab,currentIndex) values ('student','4');--创建要拉取数据的表 CREATE TABLE mysqlsource.student(id int(11) NOT NULL AUTO_INCREMENT,name varchar(255) NOT NULL,PRIMARY KEY (id) ) ENGINE=InnoDB AUTO_INCREMENT=5 DEFAULT CHARSET=utf8;--向student表中添加测试数据 insert into mysqlsource.student(id,name) values (1,'zhangsan'),(2,'lisi'),(3,'wangwu'),(4,'zhaoliu');-
3.2 代码开发实现
- 构建maven工程,添加依赖
<dependencies><dependency><groupId>mysql</groupId><artifactId>mysql-connector-java</artifactId><version>5.1.38</version></dependency><dependency><groupId>org.apache.commons</groupId><artifactId>commons-lang3</artifactId><version>3.6</version></dependency></dependencies>-
在resources资源文件夹下添加jdbc.properties
- jdbc.properties
dbDriver=com.mysql.jdbc.Driver dbUrl=jdbc:mysql://node03:3306/mysqlsource?useUnicode=true&characterEncoding=utf-8 dbUser=root dbPassword=123456 -
定义QueryMysql工具类
package com.kaikeba.source;import org.apache.flume.Context; import org.apache.flume.conf.ConfigurationException; import org.slf4j.Logger; import org.slf4j.LoggerFactory;import java.sql.*; import java.text.ParseException; import java.util.ArrayList; import java.util.List; import java.util.Properties;public class QueryMysql {private static final Logger LOG = LoggerFactory.getLogger(QueryMysql.class);private int runQueryDelay, //两次查询的时间间隔startFrom, //开始idcurrentIndex, //当前idrecordSixe = 0, //每次查询返回结果的条数maxRow; //每次查询的最大条数private String table, //要操作的表columnsToSelect, //用户传入的查询的列customQuery, //用户传入的查询语句query, //构建的查询语句defaultCharsetResultSet;//编码集//上下文,用来获取配置文件private Context context;//为定义的变量赋值(默认值),可在flume任务的配置文件中修改private static final int DEFAULT_QUERY_DELAY = 10000;private static final int DEFAULT_START_VALUE = 0;private static final int DEFAULT_MAX_ROWS = 2000;private static final String DEFAULT_COLUMNS_SELECT = "*";private static final String DEFAULT_CHARSET_RESULTSET = "UTF-8";private static Connection conn = null;private static PreparedStatement ps = null;private static String connectionURL, connectionUserName, connectionPassword;//加载静态资源static {Properties p = new Properties();try {p.load(QueryMysql.class.getClassLoader().getResourceAsStream("jdbc.properties"));connectionURL = p.getProperty("dbUrl");connectionUserName = p.getProperty("dbUser");connectionPassword = p.getProperty("dbPassword");Class.forName(p.getProperty("dbDriver"));} catch (Exception e) {LOG.error(e.toString());}}//获取JDBC连接private static Connection InitConnection(String url, String user, String pw) {try {Connection conn = DriverManager.getConnection(url, user, pw);if (conn == null)throw new SQLException();return conn;} catch (SQLException e) {e.printStackTrace();}return null;}//构造方法QueryMysql(Context context) throws ParseException {//初始化上下文this.context = context;//有默认值参数:获取flume任务配置文件中的参数,读不到的采用默认值this.columnsToSelect = context.getString("columns.to.select", DEFAULT_COLUMNS_SELECT);this.runQueryDelay = context.getInteger("run.query.delay", DEFAULT_QUERY_DELAY);this.startFrom = context.getInteger("start.from", DEFAULT_START_VALUE);this.defaultCharsetResultSet = context.getString("default.charset.resultset", DEFAULT_CHARSET_RESULTSET);//无默认值参数:获取flume任务配置文件中的参数this.table = context.getString("table");this.customQuery = context.getString("custom.query");connectionURL = context.getString("connection.url");connectionUserName = context.getString("connection.user");connectionPassword = context.getString("connection.password");conn = InitConnection(connectionURL, connectionUserName, connectionPassword);//校验相应的配置信息,如果没有默认值的参数也没赋值,抛出异常checkMandatoryProperties();//获取当前的idcurrentIndex = getStatusDBIndex(startFrom);//构建查询语句query = buildQuery();}//校验相应的配置信息(表,查询语句以及数据库连接的参数)private void checkMandatoryProperties() {if (table == null) {throw new ConfigurationException("property table not set");}if (connectionURL == null) {throw new ConfigurationException("connection.url property not set");}if (connectionUserName == null) {throw new ConfigurationException("connection.user property not set");}if (connectionPassword == null) {throw new ConfigurationException("connection.password property not set");}}//构建sql语句private String buildQuery() {String sql = "";//获取当前idcurrentIndex = getStatusDBIndex(startFrom);LOG.info(currentIndex + "");if (customQuery == null) {sql = "SELECT " + columnsToSelect + " FROM " + table;} else {sql = customQuery;}StringBuilder execSql = new StringBuilder(sql);//以id作为offsetif (!sql.contains("where")) {execSql.append(" where ");execSql.append("id").append(">").append(currentIndex);return execSql.toString();} else {int length = execSql.toString().length();return execSql.toString().substring(0, length - String.valueOf(currentIndex).length()) + currentIndex;}}//执行查询List<List<Object>> executeQuery() {try {//每次执行查询时都要重新生成sql,因为id不同customQuery = buildQuery();//存放结果的集合List<List<Object>> results = new ArrayList<>();if (ps == null) {//初始化PrepareStatement对象ps = conn.prepareStatement(customQuery);}ResultSet result = ps.executeQuery(customQuery);while (result.next()) {//存放一条数据的集合(多个列)List<Object> row = new ArrayList<>();//将返回结果放入集合for (int i = 1; i <= result.getMetaData().getColumnCount(); i++) {row.add(result.getObject(i));}results.add(row);}LOG.info("execSql:" + customQuery + "\nresultSize:" + results.size());return results;} catch (SQLException e) {LOG.error(e.toString());// 重新连接conn = InitConnection(connectionURL, connectionUserName, connectionPassword);}return null;}//将结果集转化为字符串,每一条数据是一个list集合,将每一个小的list集合转化为字符串List<String> getAllRows(List<List<Object>> queryResult) {List<String> allRows = new ArrayList<>();if (queryResult == null || queryResult.isEmpty())return allRows;StringBuilder row = new StringBuilder();for (List<Object> rawRow : queryResult) {Object value = null;for (Object aRawRow : rawRow) {value = aRawRow;if (value == null) {row.append(",");} else {row.append(aRawRow.toString()).append(",");}}allRows.add(row.toString());row = new StringBuilder();}return allRows;}//更新offset元数据状态,每次返回结果集后调用。必须记录每次查询的offset值,为程序中断续跑数据时使用,以id为offsetvoid updateOffset2DB(int size) {//以source_tab做为KEY,如果不存在则插入,存在则更新(每个源表对应一条记录)String sql = "insert into flume_meta(source_tab,currentIndex) VALUES('"+ this.table+ "','" + (recordSixe += size)+ "') on DUPLICATE key update source_tab=values(source_tab),currentIndex=values(currentIndex)";LOG.info("updateStatus Sql:" + sql);execSql(sql);}//执行sql语句private void execSql(String sql) {try {ps = conn.prepareStatement(sql);LOG.info("exec::" + sql);ps.execute();} catch (SQLException e) {e.printStackTrace();}}//获取当前id的offsetprivate Integer getStatusDBIndex(int startFrom) {//从flume_meta表中查询出当前的id是多少String dbIndex = queryOne("select currentIndex from flume_meta where source_tab='" + table + "'");if (dbIndex != null) {return Integer.parseInt(dbIndex);}//如果没有数据,则说明是第一次查询或者数据表中还没有存入数据,返回最初传入的值return startFrom;}//查询一条数据的执行语句(当前id)private String queryOne(String sql) {ResultSet result = null;try {ps = conn.prepareStatement(sql);result = ps.executeQuery();while (result.next()) {return result.getString(1);}} catch (SQLException e) {e.printStackTrace();}return null;}//关闭相关资源void close() {try {ps.close();conn.close();} catch (SQLException e) {e.printStackTrace();}}int getCurrentIndex() {return currentIndex;}void setCurrentIndex(int newValue) {currentIndex = newValue;}int getRunQueryDelay() {return runQueryDelay;}String getQuery() {return query;}String getConnectionURL() {return connectionURL;}private boolean isCustomQuerySet() {return (customQuery != null);}Context getContext() {return context;}public String getConnectionUserName() {return connectionUserName;}public String getConnectionPassword() {return connectionPassword;}String getDefaultCharsetResultSet() {return defaultCharsetResultSet;} } -
自定义MySqlSource类
package com.kaikeba.source;
import org.apache.flume.Context;
import org.apache.flume.Event;
import org.apache.flume.EventDeliveryException;
import org.apache.flume.PollableSource;
import org.apache.flume.conf.Configurable;
import org.apache.flume.event.SimpleEvent;
import org.apache.flume.source.AbstractSource;
import org.slf4j.Logger;
import org.slf4j.LoggerFactory;import java.text.ParseException;
import java.util.ArrayList;
import java.util.HashMap;
import java.util.List;public class MySqlSource extends AbstractSource implements Configurable, PollableSource {//打印日志private static final Logger LOG = LoggerFactory.getLogger(MySqlSource.class);//定义sqlHelperprivate QueryMysql sqlSourceHelper;@Overridepublic long getBackOffSleepIncrement() {return 0;}@Overridepublic long getMaxBackOffSleepInterval() {return 0;}@Overridepublic void configure(Context context) {//初始化try {sqlSourceHelper = new QueryMysql(context);} catch (ParseException e) {e.printStackTrace();}}/*** 接受mysql表中的数据* @return* @throws EventDeliveryException*/@Overridepublic PollableSource.Status process() throws EventDeliveryException {try {//查询数据表List<List<Object>> result = sqlSourceHelper.executeQuery();//存放event的集合List<Event> events = new ArrayList<>();//存放event头集合HashMap<String, String> header = new HashMap<>();//如果有返回数据,则将数据封装为eventif (!result.isEmpty()) {List<String> allRows = sqlSourceHelper.getAllRows(result);Event event = null;for (String row : allRows) {event = new SimpleEvent();event.setBody(row.getBytes());event.setHeaders(header);events.add(event);}//将event写入channelthis.getChannelProcessor().processEventBatch(events);//更新数据表中的offset信息sqlSourceHelper.updateOffset2DB(result.size());}//等待时长Thread.sleep(sqlSourceHelper.getRunQueryDelay());return Status.READY;} catch (InterruptedException e) {LOG.error("Error procesing row", e);return Status.BACKOFF;}}@Overridepublic synchronized void stop() {LOG.info("Stopping sql source {} ...", getName());try {//关闭资源sqlSourceHelper.close();} finally {super.stop();}}
}
-
4、测试
-
4.1 程序打成jar包,上传jar包到flume的lib目录下
-
4.2 配置文件准备
- vim mysqlsource.conf
# Name the components on this agent
a1.sources = r1
a1.sinks = k1
a1.channels = c1# Describe/configure the source
a1.sources.r1.type = com.kaikeba.source.MySqlSource
# 老师的是node01,同学们改成自己的节点 一定要注意
a1.sources.r1.connection.url = jdbc:mysql://node01:3306/mysqlsource
a1.sources.r1.connection.user = root
a1.sources.r1.connection.password = 123456
a1.sources.r1.table = student
a1.sources.r1.columns.to.select = *
a1.sources.r1.start.from=0
a1.sources.r1.run.query.delay=3000# Describe the channel
a1.channels.c1.type = memory
a1.channels.c1.capacity = 1000
a1.channels.c1.transactionCapacity = 100# Describe the sink
a1.sinks.k1.type = logger# Bind the source and sink to the channel
a1.sources.r1.channels = c1
a1.sinks.k1.channel = c1
-
-
4.3 启动flume配置
- bin/flume-ng agent -n a1 -c myconf -f myconf/mysqlsource.conf -Dflume.root.logger=info,console
-
4.4 最后向表添加数据,观察控制台信息
9. flume—自定义Sink
9.1 场景描述
官方提供的sink类型已经很多,官方说明:http://flume.apache.org/FlumeUserGuide.html#flume-sinks
但是,有时候并不能满足实际开发当中的需求,此时我们就需要根据实际需求自定义某些sink。
如:需要把接受到的数据按照规则进行过滤之后写入到某张mysql表中,所以此时需要我们自己实现MySQLSink。
官方也提供了自定义sink的接口:
官网说明:https://flume.apache.org/FlumeDeveloperGuide.html#sink
9.2 自定义MysqlSink步骤
-
1、根据官方说明自定义MysqlSink需要继承AbstractSink类并实现Configurable
-
2、实现对应的方法
-
configure(Context context)
- 初始化context
-
start()
- 启动准备操作
-
process()
- 从channel获取数据,然后解析之后,保存在mysql表中
-
stop()
- 关闭相关资源
-
-
3、开发流程
- 3.1 创建mysql数据库以及mysql数据库表
--创建一个数据库 CREATE DATABASE IF NOT EXISTS mysqlsource DEFAULT CHARACTER SET utf8 ;--创建一个表,用户保存拉取目标表位置的信息 CREATE TABLE mysqlsource.flume2mysql (id int(11) NOT NULL AUTO_INCREMENT,createTime varchar(64) NOT NULL,content varchar(255) NOT NULL,PRIMARY KEY (id) ) ENGINE=InnoDB DEFAULT CHARSET=utf8;- 3.2 代码开发实现
- 定义MysqlSink类
package com.kaikeba.sink;import org.apache.flume.conf.Configurable;
import org.apache.flume.*;
import org.apache.flume.sink.AbstractSink;import java.sql.Connection;
import java.sql.DriverManager;
import java.sql.PreparedStatement;
import java.sql.SQLException;
import java.text.SimpleDateFormat;
import java.util.Date;/*** 自定义MysqlSink*/
public class MysqlSink extends AbstractSink implements Configurable {private String mysqlurl = "";private String username = "";private String password = "";private String tableName = "";Connection con = null;@Overridepublic Status process(){Status status = null;// Start transactionChannel ch = getChannel();Transaction txn = ch.getTransaction();txn.begin();try{Event event = ch.take();if (event != null){//获取body中的数据String body = new String(event.getBody(), "UTF-8");//如果日志中有以下关键字的不需要保存,过滤掉if(body.contains("delete") || body.contains("drop") || body.contains("alert")){status = Status.BACKOFF;}else {//存入MysqlSimpleDateFormat df = new SimpleDateFormat("yyyy-MM-dd HH:mm:ss");String createtime = df.format(new Date());PreparedStatement stmt = con.prepareStatement("insert into " + tableName + " (createtime, content) values (?, ?)");stmt.setString(1, createtime);stmt.setString(2, body);stmt.execute();stmt.close();status = Status.READY;}}else {status = Status.BACKOFF;}txn.commit();} catch (Throwable t){txn.rollback();t.getCause().printStackTrace();status = Status.BACKOFF;} finally{txn.close();}return status;}/*** 获取配置文件中指定的参数* @param context*/@Overridepublic void configure(Context context) {mysqlurl = context.getString("mysqlurl");username = context.getString("username");password = context.getString("password");tableName = context.getString("tablename");}    @Overridepublic synchronized void start() {try{//初始化数据库连接con = DriverManager.getConnection(mysqlurl, username, password);super.start();System.out.println("finish start");}catch (Exception ex){ex.printStackTrace();}}@Overridepublic synchronized void stop(){try{con.close();}catch(SQLException e) {e.printStackTrace();}super.stop();}}
-
4、测试
-
4.1 程序打成jar包,上传jar包到flume的lib目录下
-
4.2 配置文件准备
- vim mysqlsink.conf
a1.sources = r1 a1.sinks = k1 a1.channels = c1#配置source a1.sources.r1.type = exec a1.sources.r1.command = tail -F /kkb/install/flumeData/data.log a1.sources.r1.channels = c1#配置channel a1.channels.c1.type = memory a1.channels.c1.capacity = 1000 a1.channels.c1.transactionCapacity = 100#配置sink a1.sinks.k1.channel = c1 a1.sinks.k1.type = com.kaikeba.sink.MysqlSink a1.sinks.k1.mysqlurl=jdbc:mysql://node01:3306/mysqlsource?useSSL=false a1.sinks.k1.username=root a1.sinks.k1.password=123456 a1.sinks.k1.tablename=flume2mysql -
4.3 启动flume配置
- bin/flume-ng agent -n a1 -c myconf -f myconf/mysqlsink.conf -Dflume.root.logger=info,console
-
4.4 最后向文件中添加数据,观察mysql表中的数据
-
10. Flume实际使用注意事项
- 1、注意启动脚本命名的书写
agent 的名称别写错了,后台执行加上 nohup … &
- 2、channel参数
capacity:默认该通道中最大的可以存储的event数量
trasactionCapacity:每次最大可以从source中拿到或者送到sink中的event数量
注意:capacity > trasactionCapacity
- 3、日志采集到HDFS配置说明1(sink端)
#定义sink
a1.sinks.k1.type = hdfs
a1.sinks.k1.hdfs.path=hdfs://node01:8020/source/logs/%{type}/%Y%m%d
a1.sinks.k1.hdfs.filePrefix =events
a1.sinks.k1.hdfs.fileType = DataStream
a1.sinks.k1.hdfs.writeFormat = Text
#时间类型
a1.sinks.k1.hdfs.useLocalTimeStamp = true
#生成的文件不按条数生成
a1.sinks.k1.hdfs.rollCount = 0
#生成的文件按时间生成
a1.sinks.k1.hdfs.rollInterval = 0
#生成的文件按大小生成
a1.sinks.k1.hdfs.rollSize  = 10485760
#批量写入hdfs的个数
a1.sinks.k1.hdfs.batchSize = 10000
#flume操作hdfs的线程数(包括新建,写入等)
a1.sinks.k1.hdfs.threadsPoolSize=10
#操作hdfs超时时间
a1.sinks.k1.hdfs.callTimeout=30000- 4、日志采集到HDFS配置说明2(sink端)
| hdfs.round | false | Should the timestamp be rounded down (if true, affects all time based escape sequences except %t) |
|---|---|---|
| hdfs.roundValue | 1 | Rounded down to the highest multiple of this (in the unit configured usinghdfs.roundUnit), less than current time. |
| hdfs.roundUnit | second | The unit of the round down value - second, minute or hour. |
Ø round: 默认值:false 是否启用时间上的”舍弃”,这里的”舍弃”,类似于”四舍五入”
Ø roundValue:默认值:1 时间上进行“舍弃”的值;
Ø roundUnit: 默认值:seconds时间上进行”舍弃”的单位,包含:second,minute,hour
y案例一:
a1.sinks.k1.hdfs.path = /flume/events/%Y-%m-%d/%H:%M/%S
a1.sinks.k1.hdfs.round = true
a1.sinks.k1.hdfs.roundValue = 10
a1.sinks.k1.hdfs.roundUnit = minute
当时间为2015-10-16 17:38:59时候,hdfs.path依然会被解析为:
/flume/events/2015-10-16/17:30/00
/flume/events/2015-10-16/17:40/00
/flume/events/2015-10-16/17:50/00
因为设置的是舍弃10分钟内的时间,因此,该目录每10分钟新生成一个。案例二:
a1.sinks.k1.hdfs.path = /flume/events/%Y-%m-%d/%H:%M/%S
a1.sinks.k1.hdfs.round = true
a1.sinks.k1.hdfs.roundValue = 10
a1.sinks.k1.hdfs.roundUnit = second
现象:10秒为时间梯度生成对应的目录,目录下面包括很多小文件!!!
格式如下:
/flume/events/2016-07-28/18:45/10
/flume/events/2016-07-28/18:45/20
/flume/events/2016-07-28/18:45/30
/flume/events/2016-07-28/18:45/40
/flume/events/2016-07-28/18:45/50
/flume/events/2016-07-28/18:46/10
/flume/events/2016-07-28/18:46/20
/flume/events/2016-07-28/18:46/30
/flume/events/2016-07-28/18:46/40
/flume/events/2016-07-28/18:46/50
-
5、实现数据的断点续传
- 当一个flume挂掉之后重启的时候还是可以接着上一次的数据继续收集
- flume在1.7版本之前使用的监控一个文件(source exec)、监控一个目录(source spooldir)都无法直接实现
- flume在1.7版本之后已经集成了该功能
- 其本质就是记录下每一次消费的位置,把消费信息的位置保存到文件中,后续程序挂掉了再重启的时候,可以接着上一次消费的数据位置继续拉取。
- 配置文件
- vim taildir.conf
- source 类型---->taildir
- vim taildir.conf
a1.sources = s1 a1.channels = ch1 a1.sinks = hdfs-sink1#channel a1.channels.ch1.type = memory a1.channels.ch1.capacity=10000 a1.channels.ch1.transactionCapacity=500#source a1.sources.s1.channels = ch1 #监控一个目录下的多个文件新增的内容 a1.sources.s1.type = taildir #通过 json 格式存下每个文件消费的偏移量,避免从头消费 a1.sources.s1.positionFile = /kkb/install/flumeData/index/taildir_position.json a1.sources.s1.filegroups = f1 f2 f3 a1.sources.s1.filegroups.f1 = /home/hadoop/taillogs/access.log a1.sources.s1.filegroups.f2 = /home/hadoop/taillogs/nginx.log a1.sources.s1.filegroups.f3 = /home/hadoop/taillogs/web.log a1.sources.s1.headers.f1.headerKey = access a1.sources.s1.headers.f2.headerKey = nginx a1.sources.s1.headers.f3.headerKey = web a1.sources.s1.fileHeader = true##sink a1.sinks.hdfs-sink1.channel = ch1 a1.sinks.hdfs-sink1.type = hdfs a1.sinks.hdfs-sink1.hdfs.path =hdfs://node01:8020/demo/data/%{headerKey} a1.sinks.hdfs-sink1.hdfs.filePrefix = event_data a1.sinks.hdfs-sink1.hdfs.fileSuffix = .log a1.sinks.hdfs-sink1.hdfs.rollSize = 1048576 a1.sinks.hdfs-sink1.hdfs.rollInterval =20 a1.sinks.hdfs-sink1.hdfs.rollCount = 10 a1.sinks.hdfs-sink1.hdfs.batchSize = 1500 a1.sinks.hdfs-sink1.hdfs.round = true a1.sinks.hdfs-sink1.hdfs.roundUnit = minute a1.sinks.hdfs-sink1.hdfs.threadsPoolSize = 25 a1.sinks.hdfs-sink1.hdfs.fileType =DataStream a1.sinks.hdfs-sink1.hdfs.writeFormat = Text a1.sinks.hdfs-sink1.hdfs.callTimeout = 60000 - 当一个flume挂掉之后重启的时候还是可以接着上一次的数据继续收集
运行后生成的 taildir_position.json文件信息如下:
[
{"inode":102626782,"pos":123,"file":"/home/hadoop/taillogs/access.log"},{"inode":102626785,"pos":123,"file":"/home/hadoop/taillogs/web.log"},{"inode":102626786,"pos":123,"file":"/home/hadoop/taillogs/nginx.log"}
]这里inode就是标记文件的,文件名称改变,这个iNode不会变,pos记录偏移量,file就是绝对路径
- 6、flume的header参数配置讲解
- vim test-header.conf
#配置信息test-header.conf
a1.channels=c1
a1.sources=r1
a1.sinks=k1#source
a1.sources.r1.channels=c1
a1.sources.r1.type= spooldir
a1.sources.r1.spoolDir= /home/hadoop/test
a1.sources.r1.batchSize= 100
a1.sources.r1.inputCharset= UTF-8
#是否添加一个key存储目录下文件的绝对路径
a1.sources.r1.fileHeader= true
#指定存储目录下文件的绝对路径的key
a1.sources.r1.fileHeaderKey= mm
#是否添加一个key存储目录下的文件名称
a1.sources.r1.basenameHeader= true
#指定存储目录下文件的名称的key
a1.sources.r1.basenameHeaderKey= nn#channel
a1.channels.c1.type= memory
a1.channels.c1.capacity=10000
a1.channels.c1.transactionCapacity=500#sink
a1.sinks.k1.type=logger
a1.sinks.k1.channel=c1
- 准备数据文件,添加内容
/home/hadoop/test/abc.txt
/home/hadoop/test/def.txt
-
启动flume配置
- bin/flume-ng agent -n a1 -c myconf -f myconf/test-header.conf -Dflume.root.logger=info,console
-
查看控制台
Event: { headers:{mm=/home/hadoop/test/abc.txt, nn=abc.txt} body: 68 65 6C 6C 6F 20 73 70 61 72 6B                hello spark }
19/08/30 19:23:15 INFO sink.LoggerSink: Event: { headers:{mm=/home/hadoop/test/abc.txt, nn=abc.txt} body: 68 65 6C 6C 6F 20 68 61 64 6F 6F 70             hello hadoop }